Microsoft PowerPoint is a surprisingly powerful program for adding really nice images and text to an image.
You will need TWO things for this to work...
1) Any Microsoft PowerPoint from XP to Windows 8.
2) somewhere to paste your image. I recommend GIMP or Photoshop. Paint works, but if you have something else use that.
This tutorial uses PowerPoint 2010
STEP ONE... get a picture from SimCity 4. doctor it all you want. obviously, this is a stitched mosaic. If you want to crop it do that now.
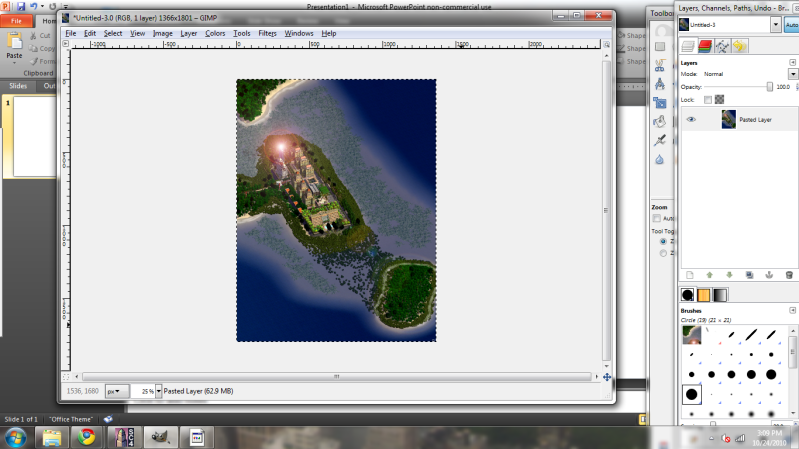
STEP TWO... cut/copy-paste it into Microsoft PowerPoint. Do not crop it, you will lose your image quality later.
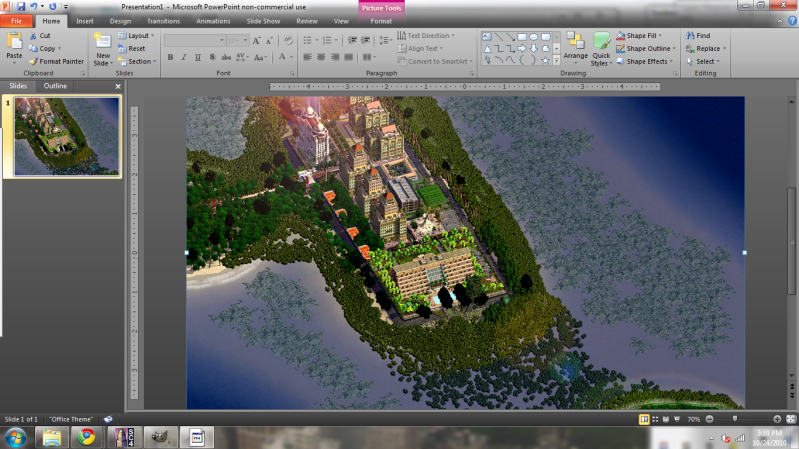
STEP THREE... find a place where you want to edit text. find the "text box" button. if your version is 2003 or older you can find it under the "draw" tab. In 2007 and 2010 it's where it is below. In 2013 it's in a similar spot in the home tab under the "shapes" menu.

STEP FOUR... draw the text box.

STEP FIVE... look for the drop-down menus that show the font and font size. if you don't want to select a size you can click the large "A" with the supescript arrow pointing up to increase the font instead.

STEP SIX... select a font and size. I chose Castellar (even though Colonna is the one highlighted, oops)

STEP SEVEN... type away! change the colors, add effects, do whatever you want. WordArt is recommended.

STEP EIGHT... move it somewhere. I moved it to the corner. notice the grayish lines off to the sides of the corners, these lines appear in the 2010 version, they mean you are perfectly aligned to it. in 2007 it will jump to the corner (as far as i can remember)

STEP NINE... once you are done, hit control and A (select all) and then control and C (copy). Copy it back to the image editor. For me, it is GIMP.

STEP TEN... crop out the transparent edges. You can do this manually (shown here) or use Image > Autocrop Image to do it for you.
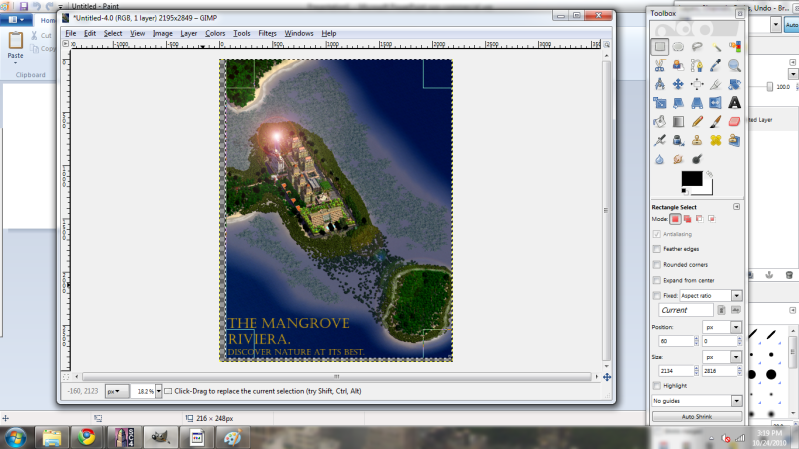
STEP ELEVEN... powerpoint blows the image up sizewise, so be sure scale the image back down. my screen resolution for sim city is 1366x768 (yes that is hacked, see the region hack tutorial) so I will scale down to 1366 and let it calculate the other numbers (since its a mosaic). DO NOT go beyond this or the original image will look pixalated, only go to your screen resolution. If your screen is 800x600 then go to 800 or below. If it's 1920x1080 HD then go up to 1920 or below. This applies to stitched images also.

STEP TWELVE... save the image. Saving in a PNG format is easiest but if you tweak some settings in GIMP when saving, you should be okay with a JPG. I'm not sure how to do that in Photoshop though.

STEP THIRTEEN... show off the finished product!
click for full resolution! (1366x1803)

You will need TWO things for this to work...
1) Any Microsoft PowerPoint from XP to Windows 8.
2) somewhere to paste your image. I recommend GIMP or Photoshop. Paint works, but if you have something else use that.
This tutorial uses PowerPoint 2010
STEP ONE... get a picture from SimCity 4. doctor it all you want. obviously, this is a stitched mosaic. If you want to crop it do that now.

STEP TWO... cut/copy-paste it into Microsoft PowerPoint. Do not crop it, you will lose your image quality later.

STEP THREE... find a place where you want to edit text. find the "text box" button. if your version is 2003 or older you can find it under the "draw" tab. In 2007 and 2010 it's where it is below. In 2013 it's in a similar spot in the home tab under the "shapes" menu.

STEP FOUR... draw the text box.

STEP FIVE... look for the drop-down menus that show the font and font size. if you don't want to select a size you can click the large "A" with the supescript arrow pointing up to increase the font instead.

STEP SIX... select a font and size. I chose Castellar (even though Colonna is the one highlighted, oops)

STEP SEVEN... type away! change the colors, add effects, do whatever you want. WordArt is recommended.

STEP EIGHT... move it somewhere. I moved it to the corner. notice the grayish lines off to the sides of the corners, these lines appear in the 2010 version, they mean you are perfectly aligned to it. in 2007 it will jump to the corner (as far as i can remember)

STEP NINE... once you are done, hit control and A (select all) and then control and C (copy). Copy it back to the image editor. For me, it is GIMP.

STEP TEN... crop out the transparent edges. You can do this manually (shown here) or use Image > Autocrop Image to do it for you.

STEP ELEVEN... powerpoint blows the image up sizewise, so be sure scale the image back down. my screen resolution for sim city is 1366x768 (yes that is hacked, see the region hack tutorial) so I will scale down to 1366 and let it calculate the other numbers (since its a mosaic). DO NOT go beyond this or the original image will look pixalated, only go to your screen resolution. If your screen is 800x600 then go to 800 or below. If it's 1920x1080 HD then go up to 1920 or below. This applies to stitched images also.

STEP TWELVE... save the image. Saving in a PNG format is easiest but if you tweak some settings in GIMP when saving, you should be okay with a JPG. I'm not sure how to do that in Photoshop though.

STEP THIRTEEN... show off the finished product!
click for full resolution! (1366x1803)

Last edited by K50 on 2012-12-31, 00:18; edited 1 time in total

 Home
Home


